New Feature: Enumerated Values

Upon popular request, airhdl now supports enumerated values for register fields.

Enumerated values are a convenient was to give names to specific field values. As an example, we’ll take a two-bit mode field that is used to control a processing engine. This field supports the following values:

• 0: disabled
• 1: manual
• 2: automatic

To edit a field’s enumerated values, bring-up the Edit Field dialog and activate the Enumerated Values tab:

For each enumerated value, enter the name and the corresponding value in the input fields and click Add:

When you’re done entering all enumerated values for a field, click Save Field:

Once you have done that, airhdl knows about those values and corresponding symbols appear in the generated files. For example, in the generated C header, you’ll find them as preprocessor defines:

2020-04-26_9-22-07

Of course, your enumerated values are available in the generated RTL code (VHDL and SystemVerilog) as constants too.

We hope you’ll find them useful.

New Feature: the Register Calculator

Calculating a register’s value from the values of its fields, or vice-versa, can be a tedious and error-prone task. It’s often a time where we developers have to pull out a sheet of paper and draw some diagrams in order to get it right.

In our quest to make your life as a developer easier, we’re introducing a new tool to airhdl called the Register Calculator. It’s available for every register created in airhdl: to start it just click on the calculator icon in the register overview:

calculator-1

This brings up the Register Calculator in a pop-up window where you’ll see a graphical representation of the register, along with an input field for every register field and an input field for the total register value. Changing the value of a field updates the total register value (at the bottom). And as you would expect, changing the register value updates the field values as well.

calculator-2

In the top right corner of the window, a radix selector lets you choose between the three usual radixes (hexadecimal, decimal and binary). The selected radix applies to all fields in the window.

Next to the register value field, three helper buttons are available for the following actions:

  • Clear the register (set all fields to zero)
  • Reset the register (set all fields to their reset value)
  • Copy the register value to the clipboard

We hope you’ll like it!

New Feature: Register Map Sharing

As a first step towards the goal of enabling true collaborative work between team members, airhdl now supports sharing register maps in a read-only way. This means that any airhdl user with a Professional subscription (which is just $199 per year or $16 per month) can now share his/her register maps with any other airhdl user. The recipient will have the right to view the shared register map, and to generate the corresponding files.

Let’s have a look at how to actually share a register map in airhdl.

At the bottom of the register map overview, you’ll notice a new “Sharing” section. To share the current register map, click on the “+ Share” link at the bottom of the table.

share1

Then, in the “Share Register Map” dialog, enter the e-mail address of the user with whom you’d like to share (please make sure to enter the e-mail address that the user actually uses to log-in to airhdl), and click the Share button.

share2

The newly created permission then appears in the sharing table:

share3

When the recipient user logs in, the register map will appear in his list of register maps, in the “Shared Register Maps” section:

share4


New Feature: Memory Interfaces

Upon popular request, airhdl now supports a new kind of register map element called a “memory interface”. Unlike the “register” and “register array” elements, a memory interface does not generate storage elements in the register bank. Instead, it allows you to connect an external SRAM to the register bank using a simple address and data bus, and to access that SRAM from the bus as if it were an array of registers.

Memory interfaces support the following access modes: read-write, write-only and read-only. While a read-write memory can be read and written from the bus,  a write-only memory can only be written from the bus (which can be useful for elements like look-up tables that must be writable by software and readable from the user logic).

To add a memory interface to an existing register map, click the “+ Memory” icon at the bottom of the registers list:

2018-07-12_21-06-31

This brings up the new memory dialog, which, in addition to the usual information, asks you for the memory depth (in elements). Each memory element occupies the same number of bytes as a single register in the memory map (4 bytes). For example, a memory with a depth of 16 will occupy 64 bytes in the memory map. The first element is accessible at the memory’s base address, while the last one resides at offset 15 · 4 = 60 from the memory’s base address.

Now let’s have a look at how to actually connect a memory to the register bank. Assuming a read-write memory interface, airhdl will generate the following user ports for the memory:

• *_addr is the read and write address
• *_wdata is the write data bus
• *_wen is the (byte-wide) write-enable signal
• *_rdata is the read data bus

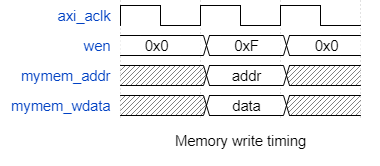
Memory writes are performed by asserting the *_wen signals while outputting the write address on the *_addr port and the write data on the *_wdata port.

mem_write

Memory reads assume a sychronous RAM with a read latency of one clock cycle:

mem_read

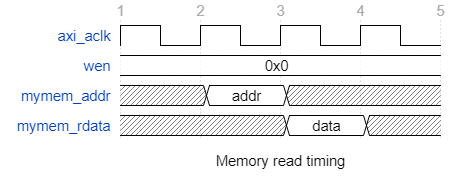
• on rising edge #2, the register bank outputs the address
• on rising edge #3, the SRAM is expected to output the corresponding data
• on rising edge #4, the register bank registers the read data on the *_rdata port

Please feel free to give memory interfaces a try, and let us know what you think.

New Feature: Duplicate Register Map

It’s now possible to duplicate an existing register map in airhdl.

For that, just click on the “Duplicate register map” link at the bottom of the register maps list:

2017-10-15_11-46-41

This will bring up the “Duplicate register map” dialog, where you can select which register map you’d like to clone:

2017-10-15_11-49-14

The freshly created register map has the same name as the original one, but with a “- COPY” suffix:

2017-10-15_11-51-44

Of course, as register map names are not allowed to contains spaces and dashes, that’s not a valid identifier. So you will need to to rename it by selecting the “edit register map” function in the register map overview:

2017-10-15_11-55-24

And then changing its name to a valid identifier:

2017-10-15_11-56-27

If you like watching videos, here’s a short demonstration of the “duplicate register map” feature:

New Feature: Register Map Revisions

The latest airhdl update adds register map revisions, an important feature for checking the consistency of generated files like C headers and VHDL/SystemVerilog components.

Each register map now has a revision number, which airhdl manages internally. When you create a new register map, its revision number is initialized to zero. Then, every time you change anything in that register map (e.g. a register or a field), the revision number is automatically incremented.

You can see a register map’s current revision number in the register map view:

2017-02-26_17-45-55

The revision number also appears in the header of every generated file. Thus, you now have an easy way to check that your generated files all correspond to the same register map revision. Just compare the numbers in the headers.

Here’s what it looks like in the VHDL header:

2017-02-26_17-51-37

Even better, it’s possible to automate that consistency check, i.e. have the C driver check that it uses the same register map revision as the VHDL/SystemVerilog register component it is talking to.

For that, C headers now have a new symbol called
<REGISTER_MAP-NAME>_REVISION, for example:

2017-02-26_17-57-53

We’ve also added that constant to the VHDL and SystemVerilog packages, which makes it really easy to create a read-only “Revision” register that returns the value of the revision number.

All you have to do is create a “value” field in that register and drive the corresponding input port using the constant mentioned above. That way, the C driver can read the register, and compare its value with the revision number it sees in the C header. In case they don’t match, you have an inconsistency between the register definitions in the C header and the actual implementation in the RTL code.

Here’s how you would map the revision number constant to a field called “value” in a register called “reg_revision”:

2017-02-27_15-28-19

Enjoy!

New Feature: Self-Clearing Fields

For driving things like “clear” or “latch-enable” signals in the user logic, it often comes in  handy to have register fields that automatically reset themselves to zero after one clock cycle. That way, writing a one to a single-bit field has the effect of generating a single-cycle pulse on the corresponding user logic port.

The good news is, airhdl now supports self-clearing fields.

To create a new field, and make it self-clearing, just check the corresponding checkbox at the bottom of the “New Field” dialog:

2017-02-17_11-15-55

Of course, it’s also possible to turn existing fields into self-clearing ones. For that, click on the “edit field” icon of the field in question:

2017-02-17_11-22-02

This will bring-up the “Edit Field” dialog where you’ll also find the “Self-clearing” checkbox mentioned above.

In the fields list, self-clearing fields are clearly identified by their “Self-clearing” badge:

2017-02-17_11-24-13

You can use self-clearing fields in registers of type READ_WRITE and WRITE_ONLY. Enjoy!


Our List of VHDL, Verilog and SystemVerilog Lint Tools

Last update: August 2022

Over the years, we’ve been looking at a number of tools to check the quality of the generated code for our web-based AXI4 register generator. Here’s a compiled list of what we have found so far. Not all tools listed below are pure linters: some are HDL editors/IDEs, others are simulators with linting capabilities. The tools are listed in alphabetical order:

Aldec ALINT-PRO

AMIQ DVT Eclipse IDE, an Eclipse-based HDL editor with linting capabilities. The same company provides a SystemVerilog Testbench Linter called Verissimo.

BluePearl Analyze RTL

GHDL, a free VHDL simulator (using the -s switch).

HDL Works HDL Companion.

Siemens EDA HDL Designer has a built-in DesignChecker tool.

Mentor Graphics Questa CDC, a tool for clock-domain crossing verification.

Real Intent Ascent

Sigasi Studio, an Eclipse-based HDL editor, has built-in linting checks such as incomplete sensitivity lists and dead code detection.

Siemens EDA Questa Lint

slang, a software library that provides various components for lexing, parsing, type checking, and elaborating SystemVerilog code.

svlint, an open-source SystemVerilog linter.

Synopsys SpyGlass

TerosHDL, an open-source IDE with code linting capabilities.

Verible has a SystemVerilog style linter (verible-verilog-lint).

Verific INVIO, a framework for building custom EDA tools.

Verilator, a free Verilog simulator has built-in linting checks.

VHDL Style Guide (VSG), a tool for enforcing VHDL coding styles.

VHDL-Tool, a VHDL syntax checking, type checking and linting tool.

Xilinx Vivado Design Suite has a lot of built-in DRCs including clock-domain crossings.

Know a tool that’s not in this list? Please let us know.